LEDEdit is a software that used for programming pixel LEDs .LEDEdit software comes in two different versions one is the discontinued LEDEdit and the other is LEDEdit-K. LEDEdit-K software is still continuing to this day.Even though LEDEdit software is discontinued it’s still being used by many people. In this tutorial we are going to cover the basics of programming pixel led using LEDEdit.
This is a revision Article of my blog post .In this article we are going to look in to the basics of LEDEdit software.Here are the topics we are going to cover –
• How to create a project in LEDEdit.
• How to create a basic pixel LED layout in LED EDIT.
• How to Program pixel LED’s.
• How To Export the project.
How to create a new project
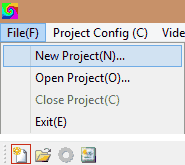
LEDEdit create a new project
Click on File and select New Project(N) or click on the new project Icon in the Menu bar 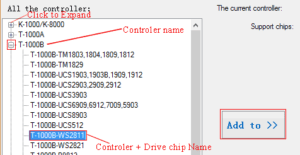 LEDEdit controller selection window[/caption]In the new project window , Click on Select Controller button . Scroll up and down and find your controller name from the list. Expand it by clicking on the + sign in front of your controller name then select the item which which contains “your controller name” – “Your pixel Led Stip/String’s Drive chip Name” .Eg – If the controller name is T1000S and the drive chip of the pixel LED Strip is “WS2811” T1000S-WS2811 should be selected from the list.Then click on Add to then click OK.

LEDEdit create a new project window
DMX Settings – These settings are for pixel LED Chips that use the DMX512 communication protocol .Please ,refer to the datasheet of the drive chip of your pixel LED strip or string to know what DMX settings your drive chip supports.PWM Polarity – This setting allows you to select the PWM signal’s polarity either positive or negative . please , refer to the datasheet of the drive chip of your pixel LED strip or string to know the correct polarity of the PWM signal.
Mode – If you are controlling less than 512 pixel LED’s choose High speed or else select Slow speed .
Frame Rate – If you are controlling less than 512 pixel LED’s you can choose a frame rate between 1fps – 30fps or else select a frame rate between 1fps – 25fps. This setting should match the frame rate of your animation or video files used in the project to have a good playback.
Seq. Channels – Depend on your drive chip you can select the sequence of each color channel data that chip receives .please , refer to the datasheet of the drive chip of your pixel LED strip or string. Most pixel led strip/string channel sequence is R,G,B. eg – WS2815 Pixel LED drive chip uses GRB channel sequence.
After selecting correct settings , Click OK.
How to create a pixel LED Layout in LEDEdit
ow you have created the project it’s time to create the pixel LED layout.The pixel led layout is how you physically arrange the LEDs in real product. There are two types of pixel LED layouts regular layouts and irregular layouts.
- Regular layouts – pixel led layouts such as rectangular or square in shape.
- Irregular layouts – pixel led layouts not rectangular or square in shape.
In this tutorial lets see how to create a 100 x 100 (Width X Height) square pixel led panel layout.

LEDEdit Auto config window
Max Number of light for each port: depends on how you going to connect your pixel LEDs to your pixel LED controller and how many pixel LEDs it supports per port . (E.g – T1000B pixel LED controller supports maximum of 2048 pixel LED’s per port ). The number with in brackets shows the amount of pixel LEDs per port supported by your controller.
Select a wiring pattern from Pattern drop down list .The pattern you select should be the pixel LED wiring pattern that going to be in your physical product . The image at the left side shows the wiring pattern you have selected .Chose a pixel LED wiring pattern that suit your design.
After all click OK button.
How to Program Pixel LED in LEDEdit

LEDEdit Add a new program

LEDEdit Video Effects

LEDEdit recording controls
Editing the Recorded

LEDEdit controlling recorded playback

EDEdit Editing recorded program
To exit the edit mode click on the Stop button .
Exporting The File in LEDEdit
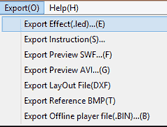
LEDEdit Exporting the program
Other Export options –
Export Instructions – Generate a read me type text file .
Export Preview Swf – Generates a .swf animation of your recording .
Export Preview AVI – Generates a .avi video of your recording .
Export layout file (dxf) – Generates a .dfx file of your layout .
Export Reference BMP file (bmp) – Generates a .bmp file of your layout
Export offline player file (bin) – Generates a .bin file of your project.
These other options can be use to generate files. So that , You can save time in other similar projects in the future.
Conclusion – LEDEdit Programming Pixel LED
 LED Edit is one of the most popular pixel LED programming software that available. There are two software versions LEDEdit and LEDEdit-K . This software have many features that provide easy programming of pixel LEDs.But , Some of the features are under developed and need to be improved . Although , This software have a custom layout creator , It’s very limited . That’s why we have to use 3rd party software like CoralDraw or AutoCad to design the custom pixel LED layouts.
Frequently Asked Questions
-
Can I follow this tutorial with LEDEdit-K ?
Yes , You can . But , Some of the features and options may not in the same places as in LEDEdit software and they may have different names. But , The basics remains the same . However , If you are interested in the LEDEdit-K version basics tutorial Click Here .
-
Can I use this software in Mac Os ?
No , You cant . This software is not designed for such operating systems . But , You maybe able to run this software on a virtual machine with windows OS loaded in it . Hopefully , There will be a Mac OS version of this software in the future .
-
Is there any alternatives to LEDEdit Software ?
Yes there are many LEDEdit alternatives Listen’s LED Player , LEDEdit Player , Power LED , RGB Player , Huacanled’s LED Build and LED Lightning Control are some of them . But , The alternative software are no match for LEDEdit software which is so far the best pixel LED programming software .
Disclaimer – The content of this article may change over the time . This is not a sponsored tutorial . We are not certain whether this software poses any security risks or not .Use at your own risk . Since , There are many downloadable setup files in the internet . We strongly advice you to scan the setup file using the virus guard before installing them . This tutorial doesn’t provide or teach any illegal activity .
Author : Senel Nanayakkara
Published on : 06|11|2020