
“Defrost timer” in the name it self explains what its purpose. But , Did you know defrost timer not only controls the defrost circle but also controls cooling circle ? . Then why it called defrost timer ?. Because , If there is no defrost circle ,There is no reason for a timer. You can directly power the cooling components without a timer .The only reason there is a timer is because of the defrost circle.That’s why it’s called defrost timer. Today these defrost timers are electronic . Usually , whole refrigerator controlled by a single microchip . Repairing or fixing these electronic timers are very hard and require good technical skills and tools . But , The old school mechanical defrost timers are easy to fix . So , In this tutorial lets look in to how to fix the defrost timer that is not working .
Purpose of a defrost timer
The defrost timer is a contentiously running timer which has two states .One state is for the defrost circle and the other is for the cooling circle . However , The time periods for each circle is different . Because , Most of the time refrigerator should be in cooling circle and occasionally the defrost circle should kicked in to melt the ice build up in the evaporator . Defrost timer will be on cooling circle 6+ hours and in the defrost circle on 5+ minutes. Defrost timer works continuously while Periodically changing it’s states.
Working Principle of a Mechanical Defrost Timer
The defrost timer consist of three main sections .At the top there is the motor drive system . At the middle is the wheel drive train and at the bottom is the relay drive system .
Motor Drive system
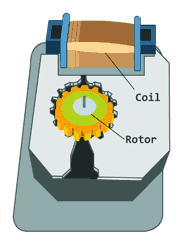
defrost timer inside motor
The motor drive system uses a AC shaded pole induction motor which rotates at consent speed (80 – 120 rpm) . Since , There is only a one coil .You may ask how this motor rotates . Shaded pole motors have a copper ring (shaded ring) that works as a secondary winding .The rotor is a squirrel cadge rotor . This motor rotates only in one direction . This is what drives the mechanical timer .
Wheel Drive Train
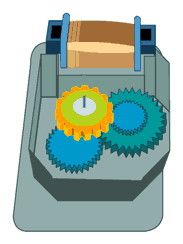
Defrost timer inside gear wheels
It’s a set of plastic gear wheels what used to reduce the speed of the motor . A small gear wheel that has low amount of tooth in the spindle of the rotor drives a set of big wheels that has higher amount of tooth .Thus reducing the speed of rotation. The output of these wheel train given out by a another small wheel to the relay drive system.
Relay Drive System

defrost timer inside relay
The relay drive system consists of a big gear wheel and relay contacts .At the bottom of the gear wheel studded with a peg along its surface which pushes or retracts the middle contact (Common contact) towards the other two contact points while it rotates .Breaking and creating contacts as it rotates .
Causes of Mechanical Defrost Timer Malfunction
There are are several things that can cause defrost timer malfunction . However ,These things can be fixed easily .Here are some of the causes of defrost timer malfunction and how to fix them.
Bad Motor Coil

Checking the motor coil
The motor that drives the timer works non stop .Eventually the shaded pole motor can go bad .The part of the motor that more likely to be damaged is the coil . As the motor works insulated coil wires gets heated and this heating coil wires can harden the insulation around them and breaking it causing short circuit .
Testing – Only thing you can check using a multi meter is whether the coil is open or not .Put your multi meter in Ohm scale and touch the connector pins of the motor . If your readings are very large or if your multi meter shows OL (Open Loop) .You have a damaged coil. However there is no easy way to check for shorted coils .
Fix – You can re-insulate using shellac.But , each winding layer is separated re-insulation can be difficult. You can rewind the coil pack using a same gauge coil .But , Unless you have machinery to do that , It can take lot of time and effort .
Stuck gear wheels
 As the motor rotates , The gear wheel train also rotates .These gear wheels are made out of plastic or polymer .The tooth of the gears can wear due to the heat generated by the friction . This can cause the gear wheels to be stuck .
Fix – Remove the motor cover of the defrost timer .Then , Remove the rotor and apply silicon grease to the tooth of the gear wheels . If tooth were damaged , Replace the wheels that have damaged tooth .
Bad relay Contacts

Sanding contact points of defrost timer
As the relay drive wheel rotates the contacts made and breaks .As the contacts touches each other sparks can appear these sparks appear due to the current flow through two contact points .These can cause the contact points to be damaged . If contact points are damaged and deformed the contacts are not properly made .Thus No current flow .
Fix – Use a fine sand paper (600P -1000P) and sand it down to it’s proper shape to make sure proper contacts made between each contact points .
Oxidation

Cleaning oxidized metal parts
If you are living in a coastal area ,you know that oxidization is a big problem in day-today life. These oxidization can effect any metal part inside the defrost timer .
Fix – Take apart the defrost timer. Use a toothbrush dipped in a isopropyl alcohol and brush any metal part inside or use a contact cleaner and spray to the metal contacts inside the defrost timer.
Electronic defrost timer

Refrigerator electronic timer
Some refrigerator manufacturers use a electronic defrost timer instead of a mechanical defrost timer. If you used a electronic defrost timer instead of a mechanical one , There are some pros . Less moving parts means better lifetime. However , There are some cons too . These devices are very sensitive to electric noise , any spike in voltage can damage this device .
These electronic timers mainly consist of a relay and a timer IC .However , As these timers get old , Any of the electronic components can go bad. If you are trying to repair these timers . First start with the timer IC . Download and read the datasheet of the component and check whether the rated voltages are available in at the IC pins . Make sure to check the output pin voltages are available too. If every thing is OK . Check the relay .If everything works fine , check for the dry or cold solder joints . If there is any re-solder them.
Conclusion
Electro-Mechanical defrost timers are easy to repair .It doesn’t require special knowledge . These defrost timers can malfunction due to bad motor coil , stuck gear wheels , bad relay contacts and oxidization . However , These problems can be easily solved without buying a new defrost timer.
Electronic defrost are not common. But , They exist . You can replace a mechanical timer with a electronic one or electronic one with a mechanical one . But , You may have to change the wiring order of the connector. However , Repairing such unit require good knowledge in electronics and tools.
In modern refrigerators , You will not find a separate timer unit. Instead , The timer is build inside the main microchip. Most of the time it uses watch-dog timer feature inside the microcontroller as the defrost timer .
Frequently Asked Questions
How to replace a Mechanical timer ?
Look for the part number mentioned in the defrost timer . Then call your local electronic store and ask for a defrost timer with the exact part number . If you cant find it locally , google the part number and find a deal on the part online . Remove the original part and connect the new part (plug the connector correctly as it was on the original part).
Can I replace a mechanical timer with a electronic one ?
Yes , You can . But , You have to match the wires .You can use a multimeter to do that. You have to identify the power cables and relay contact output wires separately. Then , connect those wires to the electronic timer correctly (look for the pin out labels in the timer). Since , Some electronic timers uses lower DC voltages instead of AC mains voltage , You may have to use a voltage regulator to power the electronic defrost timer .
Can I replace a electronic timer with a mechanical one ?
Yes , You can . As we have mentioned in the above answer. You have to match the wire connections and make sure the supply voltages match the mechanical timers supply voltage ratings . Also , Make sure the relay current ratings of mechanical timer match the relay current rating of electronic timer .
Can you repair a microcontroller based timer ?
Check for the continuity of the wires and make sure there are no cold solder points in the main board .If there is , re-solder them. If the cause of the not working timer is the microchip in the main controller board , Try to google and find a replacement IC (With the program) and replace the original one . If you cant find the replacement microchip with the program , Look for a replacement main board .
Disclaimer – The contents of this article may change anytime.This tutorial involves working with high voltages . In order to work with such voltages , It requires special tools and protective equipment. Make sure to take every safety measure necessary . If you don’t have any experience working with high voltages .Please , Get someones (Someone who have experience ) help to follow this tutorial.If you are not a experienced technician , Don’t work on the refrigerator while it is connected to the mains.